
This article will serve as a quick start guide and will cover the basics to ensure you can work on your projects smoothly and efficiently.
For more specific settings/options, you can refer to the memoQ documentation page and to the other guides we provide on our Knowledge Base for linguists.
Opening/checking out a project
Once you have received a PO from your Project manager, head to memoQ and click on Check Out From Server on the Project ribbon. There, you will see a list of all the projects where you are added as a linguist.
The first time you try to check out an online project, you will need to insert a server URL. This will be either “memoQ-app.codexglobal.net” or “nextmemoQ-app.codexglobal.net“. If you are unsure please check with your PM or in your PO. Click the tick symbol to select.

The Log in to server window appears, where you will need to insert a username and password. These would have been provided by your Project Manager and they are different from the ones you use to access Codex Portal. They can also be found in your PO. MemoQ saves your username and password, so next time you connect to the same memoQ server, you will not have to enter your information again.
Your username is typically in the following format:
Lastname, Firstname

After inserting your credentials, the projects you have been assigned to (if any) will appear in a window.
Simply select the project you need to work on and press Check out project.

If you see the following message, this means that you are currently not assigned to any projects. If you think that this is incorrect, please contact your Project Manager.

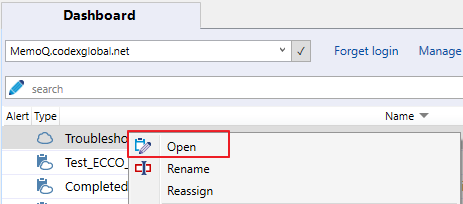
Once you have checked out your project, this will appear on your Dashboard and you can simply open it from there when needed by double-clicking or by right-clicking > Open.
Now that you have checked out your project, you can open the file(s) you have been assigned to by simply double-clicking on the file or by right-clicking > Open For Translation.

Creating views
If you are working on multiple files in the same project, you may want to create a view of all your files to ensure that when using auto-propagation and automatic lookup, all repetitions (in all files) are validated in one go.
Simply select the files in question, right click and select create view > simply glue documents together.

Before you can create your view, you will simply need to name it. This will then create your view in your Views section.

Termbase and Translation memory lookup
As you start translating, you will notice to your right a Translation results pane.
Here you will mainly need to focus on the red (translation memory) and blue (glossary) results.

For further information on the colouring system used, as well as other details about this useful Translation results pane, please consult https://docs.memoq.com/current/en/Places/translation-results-list.html.
- The TM results will show you all previously-translated content that fully or somewhat matches the segment you are translating.
- If you’d like to check how a word or a combination of words were translated in the past, you can select them and use the shortcut CTRL+K to run a concordance search.

- The termbase results will show you the terminology that should be used in the segment in question. This will also be highlighted in your source segment so you are aware that approved terminology already exists for the highlighted terms.


Confirming segments
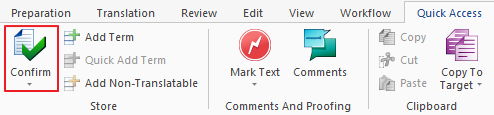
Once you have translated your segment, you will need to confirm it so it is saved into the translation memory. To do so, you can use the CTRL+ENTER shortcut or you can head to Quick Access > Confirm.
Useful settings
Preview Pane
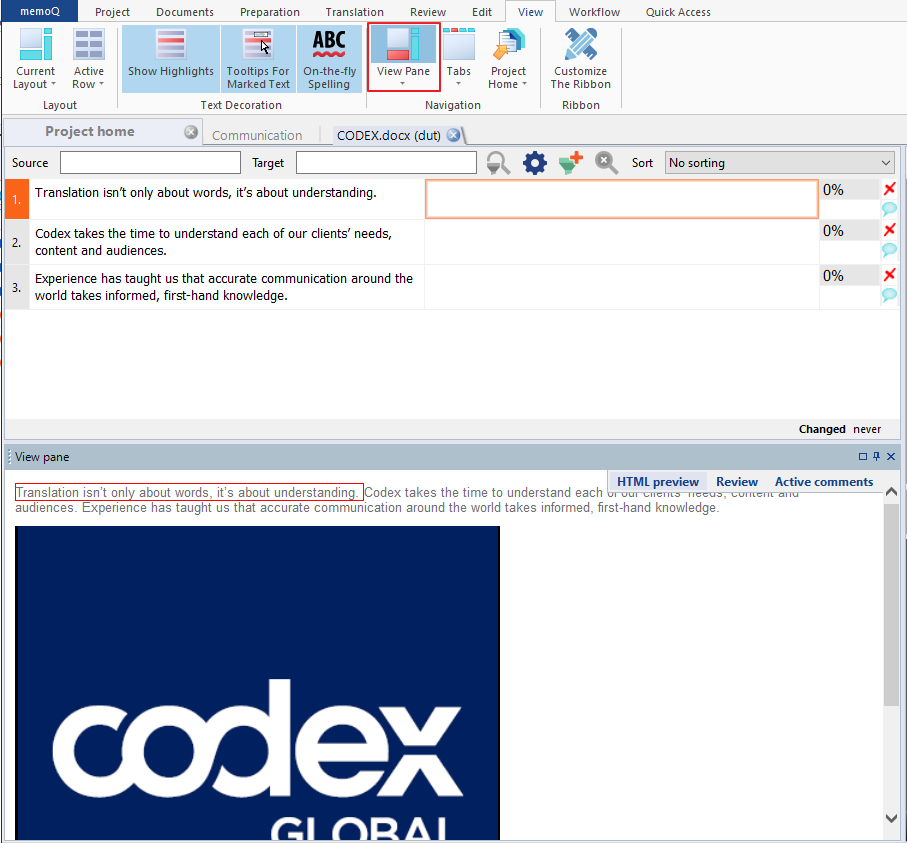
In most cases, you can preview your file while you work on it.
Head to View tab > View Pane. This will create a preview pane at the bottom of your document where you can preview your translation in context:
Auto-propagation
Auto-propagation ensures that once you confirm a segment, all its instances (repetitions) are automatically populated in the whole document or a view.
To turn these settings on, head to Translation > Translation settings > Auto-Propagation.
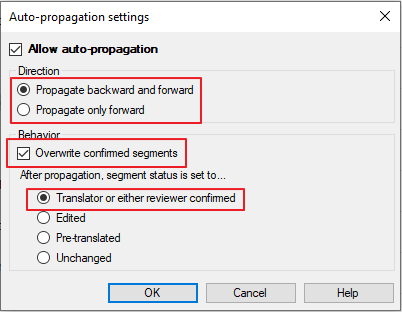
Depending on the type of document you are working on, you may decide to choose different settings.
You can enable memoQ to work backward and forward. This means that you want memoQ to update the segments before and after the one you are working on. Instead, if you’d like memoQ to only make changes after the selected segment, then you will need to tick propagate only forward. Please do keep in mind that backward auto-propagation will overwrite segments where you might have inserted a different translation depending on the context.
By selecting the overwrite confirmed segments, memoQ will update all segments either backward and forward or only backward.
The segments should appear as confirmed (as per screenshot).

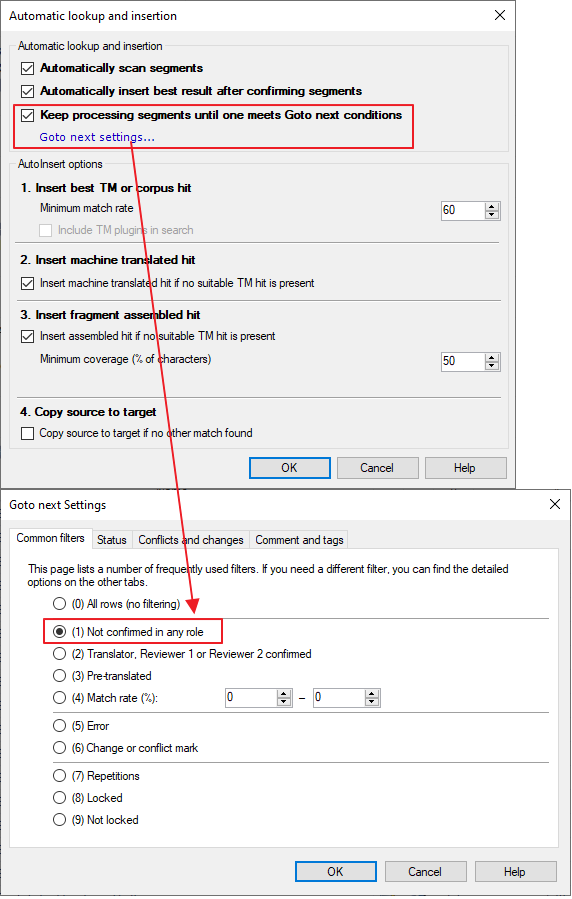
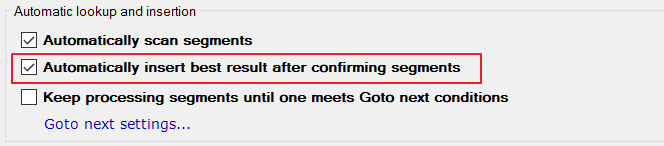
Automatic lookup, insertion and Go-to rules
By default, when confirming a segment using CTRL+ENTER, memoQ will jump to the following one, but that might already be confirmed because it’s a 100% match or a repetition (if you have previously enabled Auto Propagation). Instead, you can instruct memoQ to jump to the next unconfirmed segment and skip the already-confirmed ones.
Simply open your file and head to Translation > Translation Settings > Automatic lookup and insertion > Goto next settings. This is particularly important if you are not required to review 100% matches and repetitions.
Translator’s settings
Proofreader’s settings
AutoInsert
AutoInsert will automatically fill the segment with the entry that better fits the settings you have inserted after you confirm the previous segment.
In order to activate Automatic Insertion, open your local copy of the file and go to Translation -> Translation Settings -> Automatic lookup and insertion:
First, you need to make sure the option is enabled:
Then, you will need to tweak the insertion match rate so that the results you receive are relevant. 60 is the recommended setting:

Finally, if you are working on an MTPE project, you will may want to tick the following setting so that the MT result is automatically inserted in the segments where there is not a match:

These settings are intended to make the translation process easier and faster, ensuring you get as much advantage as possible from the different resources inserted in memoQ. They can be tweaked to better match your style of work or a specific project, but you need to keep in mind that if you modify them for a specific project, they will be saved unless you revert your changes.
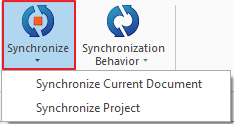
Synchronisation behaviour
By default, your synchronisation behaviour will be set to the following:

This allows your project to be automatically saved and it’s typically the best option to use when working on a server.
However, if you do have a very low internet connection, to avoid memoQ being particularly slow, you may want to switch it to manual.
Pre-delivery checks
Before delivering your file(s), please ensure to run a spell check and a QA review. These two steps will ensure that your file does not contain any typos, tag errors, etc.
Spell checker
To run a spell check, simply use the shortcut F7 or head to Translation > Spelling/Grammar.

A window will open with flagging a potential typo and the suggested corrections.
Press “correct“, if the word flagged is indeed a typo, select the suitable correction; “skip all” (this will skip all instances of that word), if this does not need to be corrected; or “add“, if there’s an ignore list and you wish to add it to the list of words that can always be ignored.

You can check if any ignore list was selected by opening the Ignore list tab in the spell checking window.
QA review
Before delivering your project, you must run a Quality Assurance check. All projects coming from Codex will have pre-set QA settings, either called CODEX_DEFAULT or a specific account name:
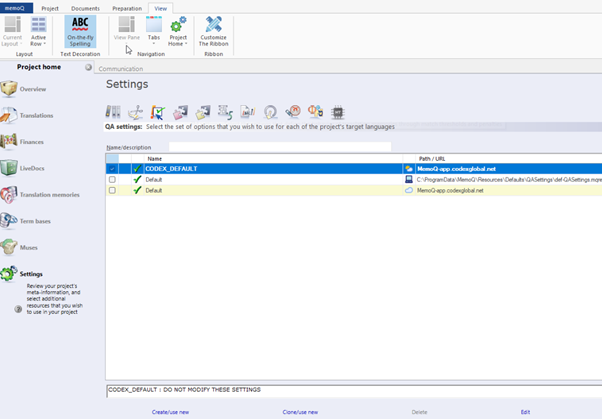
Please do not change these settings.
After you are finished, head to Review > Quality Assurance. This will open up a tab with all the errors and warnings that appear in your document and will give you the opportunity to spot and fix any terminology issues, inconsistencies, tag and punctuation errors, etc.

If the flagged segments are correct and do not need any amendments, you can simply press “ignore” so that your Project Manager is aware that you have checked the segment and that it is correct.
For more info on ignoring QA warnings, you can visit the memoQ docs at https://docs.memoq.com/current/en/Places/resolve-errors-and-warnings-tab.html and https://docs.memoq.com/current/en/Places/ignore-all-warnings-of-this-ki.html.
Delivery
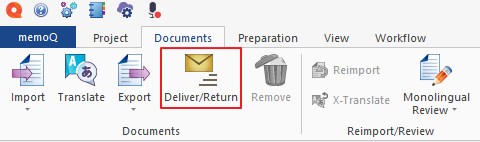
Once you have finished working on your file(s), have run a spell check and have done a QA review, select your file(s) and head to Documents > Deliver/Return.
Mac users
The memoQ software is currently unavailable for Mac users. However, a Virtual Machine can be installed on your Mac to emulate a Windows environment, where you will be able to download memoQ.
Alternatively, you can use WebTrans, a web-based memoQ version that will simply open in your browser. This online version, however, should only be used as an exception (e.g., for very short projects or when you don’t have access to your computer), as it has limited functionality compared to the desktop version and does not provide all the essential features that help carry out efficient and high-quality work. For example, WebTrans displays tags all the same, not distinguishing a line break from a formatting one or a tag created with RegEx Tagger, it does not show information imported as Context and, most importantly, it is not optimised for running efficient and thorough Quality Assurance checks.